Showing posts with label EPiServer 8. Show all posts

Monday, March 14, 2016

How to validate old passwords when migrating from Membership provider to ASP.NET Identity in Episerver

Wouldn’t be nice to be able to validate the old passwords when you migrate from Membership provider to ASP.NET Identity? This was one of my headaches in an earlier project, but here is the solution.

Prerequisite 
The example in this post are based on the code from here: http://sveinaandahl.blogspot.no/2015/08/how-to-integrate-aspnet-identity-with.html

Note!
One of the things you should check out first in the original Episerver solution's web.config. Here you will find the hash algorithm type that’s used in the Membership provider. In the example below you can see «HMACSHA512» is used. 

From Web.config:

<membership defaultProvider="SqlServerMembershipProvider" userIsOnlineTimeWindow="10" hashAlgorithmType="HMACSHA512">

The whole clue when you migrate the passwords is to put the hashed password together with the password format, that’s always 1, and the password salt. Then you put it into the Hashed Password field in the new database.

e.g.: aspnet_Membership.Password+'|'+ 1 +'|'+aspnet_Membership.PasswordSalt

In the User Manager code you override the PasswordHasher function. When you get a user that has a password with this type of password format use the original way to encrypt the passwords in Membership provider, or else you can use the base version of PasswordHasher. Use the same hash algorithm type that you used to create in the original solution.

IdentityConfig.cs
Override the Password hasher function.

namespace TestSite
{
    // Configure the application user manager used in this application. UserManager is defined in ASP.NET Identity and is used by the application.
    public class ApplicationUserManager : UserManager<ApplicationUser>
    {
        public ApplicationUserManager(ApplicationUserStore store)
            : base(store)
        {
            PasswordHasher = new MyPasswordHasher();
        }
 

MyPasswordHasher.cs
Add a new class called MyPasswordHasher.cs

using System;
using System.Security.Cryptography;
using System.Text;
using Microsoft.AspNet.Identity;
 
namespace TestSite
{
    public class MyPasswordHasher : PasswordHasher
    {
        public override string HashPassword(string password)
        {          
            return base.HashPassword(password);
        }
 
        public override PasswordVerificationResult VerifyHashedPassword(string hashedPassword, string providedPassword)
        {
            var passwordProperties = hashedPassword.Split('|');
            if (passwordProperties.Length != 3)
            {
                return base.VerifyHashedPassword(hashedPassword, providedPassword);
            }
            else
            {
                var passwordHash = passwordProperties[0];
                const int passwordformat = 1;
                var salt = passwordProperties[2];
                if (String.Equals(EncryptPassword(providedPassword, passwordformat, salt), passwordHash, StringComparison.CurrentCultureIgnoreCase))
                {
                    return PasswordVerificationResult.SuccessRehashNeeded;
                }
                else
                {
                    return PasswordVerificationResult.Failed;
                }
            }
        }
 
        private string EncryptPassword(string pass, int passwordFormat, string salt)
        {
            if (passwordFormat == 0) 
                return pass;
 
            byte[] bIn = Encoding.Unicode.GetBytes(pass);
            byte[] bSalt = Convert.FromBase64String(salt);
            byte[] bRet = null;
 
            if (passwordFormat == 1)
            {  
                HashAlgorithm hm = HashAlgorithm.Create("HMACSHA512"); 
 
                if (hm is KeyedHashAlgorithm)
                {
                    KeyedHashAlgorithm kha = (KeyedHashAlgorithm)hm;
                    if (kha.Key.Length == bSalt.Length)
                    {
                        kha.Key = bSalt;
                    }
                    else if (kha.Key.Length < bSalt.Length)
                    {
                        byte[] bKey = new byte[kha.Key.Length];
                        Buffer.BlockCopy(bSalt, 0, bKey, 0, bKey.Length);
                        kha.Key = bKey;
                    }
                    else
                    {
                        byte[] bKey = new byte[kha.Key.Length];
                        for (int iter = 0; iter < bKey.Length; )
                        {
                            int len = Math.Min(bSalt.Length, bKey.Length - iter);
                            Buffer.BlockCopy(bSalt, 0, bKey, iter, len);
                            iter += len;
                        }
                        kha.Key = bKey;
                    }
                    bRet = kha.ComputeHash(bIn);
                }
                else
                {
                    byte[] bAll = new byte[bSalt.Length + bIn.Length];
                    Buffer.BlockCopy(bSalt, 0, bAll, 0, bSalt.Length);
                    Buffer.BlockCopy(bIn, 0, bAll, bSalt.Length, bIn.Length);
                    bRet = hm.ComputeHash(bAll);
                }
            }
            return Convert.ToBase64String(bRet);
        }
 
    }
}

Migration of the database.
Since the database is created by the Entity Framework the first time you run the Episerver application with ASP.NET Identity, I recommend you not to try to use any create tables in the migration script. Since this often end up being a corrupt database for the Entity Framework.

The simple version would be just to do inserts on a existing database. The migration script could look something like the script below. Notice how the password format is set together.

The script below is not well tested, but it gives you an idea how it could work.

INSERT INTO AspNetUsers(Id,Email,EmailConfirmed,PasswordHash,SecurityStamp,
PhoneNumber,PhoneNumberConfirmed,TwoFactorEnabled,LockoutEndDateUtc,LockoutEnabled,
AccessFailedCount,UserName)
SELECT aspnet_Users.UserId,aspnet_Membership.Email,'true',
(aspnet_Membership.Password+'|'+CAST(aspnet_Membership.PasswordFormat as varchar)+'|'+aspnet_Membership.PasswordSalt),
NewID(),NULL,'false','true',aspnet_Membership.LastLockoutDate,'true','0',aspnet_Users.UserName
FROM aspnet_Users
LEFT OUTER JOIN aspnet_Membership ON aspnet_Membership.ApplicationId = aspnet_Users.ApplicationId 
AND aspnet_Users.UserId = aspnet_Membership.UserId;


TIPS
If you are going to run this script several times without getting duplicates you should probably look into using cursor scripts in sql. This way you would avoid inserting a user that's already migrated.

Have fun!

Wednesday, January 13, 2016

Tips for installing Episerver standard search with SSL

I wrote a blog post on how to setup Episerver Standard Search more than three years ago. After getting some questions about how use of SSL together with Episerver standard search, I thought I should share some useful tips here. I noticed that several people have written about this topic earlier, so this is more like an add on to this.


First of all, you should get the solution up and running without SSL. You will find a guide how to do that from this blog:


There are a two elements you will need to add to the web.config, when you want to add ssl support to your solution. Changes are marked with yellow background.

Web.config

 <system.serviceModel>
    <serviceHostingEnvironment multipleSiteBindingsEnabled="true" />
    <bindings>
      <webHttpBinding>
        <binding name="IndexingServiceCustomBinding" maxBufferPoolSize="1073741824" maxReceivedMessageSize="2147483647" maxBufferSize="2147483647">
           <security mode="Transport">
              <transport clientCredentialType="None"></transport>
           </security>
          <readerQuotas maxStringContentLength="10000000" />
        </binding>
      </webHttpBinding>
    </bindings>
  </system.serviceModel>


  <episerver.search active="true">
    <namedIndexingServices defaultService="serviceName">
      <services>
        <add name="serviceName" baseUri="https://DNS-name/IndexingService/IndexingService.svc" accessKey="local" />
      </services>
    </namedIndexingServices>
    <searchResultFilter defaultInclude="true">
      <providers />
    </searchResultFilter>
  </episerver.search>


IIS
In IIS you will need to add a https binding and perhaps remove the http. :-)


If everything is working fine you should get up a web service in your browser from this url (including the https): https://YourDnsName/IndexingService/IndexingService.svc

If not, you should read on. :-)

TIPS! «HTTP Activation» is a feature that is often forgot. So it's always smart to check if that's activated for the asp.net version you use in the project.

My experience is that it’s usually two things with the setup that’s not correct, when using SSL together with standard search. One is the lack of knowledge about certificates and how to install them, and second is how to setup the IIS correct.

Different certificates
The most used certificate types are «Domain validated certificates» and «Extended validation certificates». The use of EV certificate can be easily spotted by that the url field in the browser get an «green bar» in the beginning. More and more sites has started to use these EV certificates.They usually cost little more and takes longer to order because of the validation process.

Extended Validation Certificate
EV certificates use the same encryption as domain validated certificates: The increase in security is due to the identity validation process, which is indicated inside the certificated by the policy identifier.

Ref: https://en.wikipedia.org/wiki/Extended_Validation_Certificate


Production environment 
Before IIS8, there was an problem to have more than one certificate per server, since most server have only one IP address. Often this could be solve by using a SAN certificate that contain several domains.

With Windows 2012 (IIS8) came a new feature called Server Name Identification (SNI), which made it possible to use several certificate on same IP.

You can find more information on how to install this things here:

Single Certificate and Multiple Certificates Using SNI (IIS8)
https://www.digicert.com/ssl-certificate-installation-microsoft-iis-8.htm


Development environment
In development we usually just create a self-signed certificate. When you create this in IIS they are usually «Issued To» your computer name. What you write in as Friendly name doesn’t really mater.
So, if you want to avoid to getting a certificate error when you run your site in the browser you should use your machine name as localhost name.

TIPS! If you only are using one certificate you put the certificate into «Personal». If you are going to use SNI, you must add it to «Web Hosting».


How to access the certificate 
If you get access denied in the log file, here is a way to fix that. After you have create the certificate to the Personal folder, then type "MMC" in Windows search and open it up.(got an icon of a red tool box)

Then goto FILE -> Add/Remove Snap-in. -> Select Certificates -> click Add-> Select Computer account -> Local Computer -> Finished -> Ok.

Then open up Certificates -> Personal. Here you will find the certificate you have created or installed earlier.


Add Permissions to the certificate
Right click on the certificate(marked blue on picture above) -> All tasks -> Manage Private Keys -> Add "Network Service" user -> Remove «Full control» (only read is necessary) -> OK


IIS
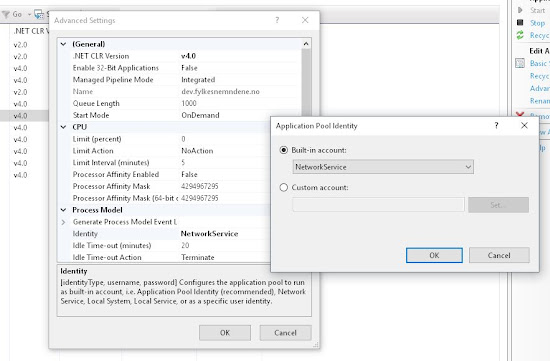
Now add «Network Service» to the Application Pool to the site you use in IIS for the site with SSL. This will give the App pool identity access to both certificate and the site.


Happy configuring! :-)


Friday, December 18, 2015

How to improve performance with ASP.NET Identity and Episerver

I have written a few blog posts now about how to implement ASP.NET Identity in Episerver. If you use the ASP.NET Identity data model out of the box, you could run into some performance issues with large quantity. With a few tricks you could optimize the data model and improve the performance a lot. I have tested this changes with a database that contains more than 400 thousand users. The performance improved with more than 10 times.

When it comes to both performance and security it’s important that the database isn’t running on the same server as the CMS.

Important note! If you already got a database model up and running and apply this changes you would need to do a migration to new database model. Here is some reference on how to fix that if you run into this problem: 


Prerequisite 

The example in this post are based on the code from here: http://sveinaandahl.blogspot.no/2015/08/how-to-integrate-aspnet-identity-with.html

Database model

It was several elements I found during the analyze that could improve the performance, but here are a few easy fixes.

  • It’s important that Datatypes in the database isn’t using  MAX, e.g. NVARCHAR<MAX>. It’s actually better to set a large number. SQL will not index datatype the contains the datatype MAX.
  • When this is fixed. You can add index on selected tables. By doing this the request dropped from 200 milliseconds to 30. 
  • Another effect by adding indexs is that the SQL server will be steady, even if the CMS frontend server gets a lot of request.

Most of this changes can be done through Entity framework. All the changes you want to apply to the data model can implemented in the OnModelCreating function.  Here you can change the datatype and add index types that will be used a lot.


Update Models/Account/ApplicationUser.cs with this code


using System.ComponentModel.DataAnnotations.Schema;
using System.Data.Entity;
using System.Data.Entity.Infrastructure.Annotations;
using System.Security.Claims;
using System.Threading.Tasks;
using Microsoft.AspNet.Identity;
using Microsoft.AspNet.Identity.EntityFramework;
 
namespace TestSite.Models.Account
{
    // You can add profile data for the user by adding more properties to your ApplicationUser class, please visit http://go.microsoft.com/fwlink/?LinkID=317594 to learn more.
    public class ApplicationUser : IdentityUser
    {
        public async Task<ClaimsIdentity> GenerateUserIdentityAsync(UserManager<ApplicationUser> manager)
        {
            // Note the authenticationType must match the one defined in CookieAuthenticationOptions.AuthenticationType
            var userIdentity = await manager.CreateIdentityAsync(this, DefaultAuthenticationTypes.ApplicationCookie);
            // Add custom user claims here
            return userIdentity;
        }
    }
 
    public class MyClaims : IdentityUserClaim
    {
    }
 
    public class ApplicationDbContext : IdentityDbContext<ApplicationUser>
    {
        public ApplicationDbContext()
            : base("EcfSqlConnection", throwIfV1Schema: false)
        {
            Database.SetInitializer<ApplicationDbContext>(new DropCreateDatabaseIfModelChanges<ApplicationDbContext>());
        }
 
        public static ApplicationDbContext Create()
        {
            return new ApplicationDbContext();
        }
 
        protected override void OnModelCreating(DbModelBuilder modelBuilder)
        {
            base.OnModelCreating(modelBuilder);
 
            //Shorten length on existing datatypes => improve performance
            modelBuilder.Entity<ApplicationUser>().Property(u => u.PhoneNumber).HasMaxLength(20);
            modelBuilder.Entity<ApplicationUser>().Property(u => u.PasswordHash).HasMaxLength(1024);
            modelBuilder.Entity<ApplicationUser>().Property(u => u.SecurityStamp).HasMaxLength(1024);
            modelBuilder.Entity<MyClaims>().Property(u => u.ClaimType).HasMaxLength(512);
            modelBuilder.Entity<MyClaims>().Property(u => u.ClaimValue).HasMaxLength(512);
 
            //Indexing important datatypes. => improve performance
            modelBuilder.Entity<ApplicationUser>().Property(u => u.Email).HasColumnAnnotation("Index", new IndexAnnotation(new IndexAttribute()));
        }
    }
}

Happy coding!

Thursday, December 3, 2015

How to login to EPiServer with Facebook

Wouldn't it be great to be able to login with another Identity Provider, e.g. Facebook, in your Episerver solution? Which could giving you the ability to extract Facebook information from you users. In the picture below, you can see your Facebook picture and username displayed in the header on the standard Episerver Alloy demo after login.


Prerequisite 
First, you will need to create a login based on the ASP.NET Identity instead of Membership provider. You find how to do that here. This example should work with EPiServer version 8 from 14 November 2014 and up. However, I recommend updating to the latest version.

Create a connection with Facebook
You will need to setup an App on Facebook to be able to create a connection. Go to https://developers.facebook.com/apps to do that. Here is a good link to how to setup the connection step-by-step, http://www.oauthforaspnet.com/providers/facebook/

Tips! Remember that after you have create an App, you can add a platform. In this case, you would add a “website”. Since this is a test case, you can add a localhost address here. Notice the App ID and App Secret, which you will need later on.


Necessary nuget packages
You will need at least one nuget package to be able to create this connection in your project.

  • Install-Package Microsoft.Owin.Security.Facebook 

Other nuget packages that could come handy later on:

  • Install-Package Microsoft.Owin.Security.Google 
  • Install-Package Microsoft.Owin.Security.MicrosoftAccount 
  • Install-Package Microsoft.Owin.Security.Twitter 

If you want to extract more information from Facebook, you will need to install this one too.

  • Install-Package Facebook


Startup.cs
If you only want the plain login you don’t need specify anything more than the following lines in the Startup.cs.

   var facebookOptions = new FacebookAuthenticationOptions();
   facebookOptions.AppId = "xxxxxxxxxxxxxxxx";
   facebookOptions.AppSecret = "xxxxxxxxxxxxxxxxxxxxxxxxxxxxxxxx";
   app.UseFacebookAuthentication(facebookOptions);

However, if you want to extract more information through scopes and token it could look something like this:

    var facebookOptions = new FacebookAuthenticationOptions();
    facebookOptions.Scope.Add("email");
    facebookOptions.AppId = "xxxxxxxxxxxxxxxx";
    facebookOptions.AppSecret = "xxxxxxxxxxxxxxxxxxxxxxxxxxxxxxxx";
    facebookOptions.Provider = new FacebookAuthenticationProvider()
    {
        OnAuthenticated = async context =>
        {
            //Get the access token from FB and store it in the database and use FacebookC# SDK to get more information about the user
            context.Identity.AddClaim(new System.Security.Claims.Claim("FacebookAccessToken", context.AccessToken));
        }
    };
    facebookOptions.SignInAsAuthenticationType = DefaultAuthenticationTypes.ExternalCookie;
    app.UseFacebookAuthentication(facebookOptions);


Extend the login screen
Since I already have styled the login screen in Episerver style, I have just extended it with a partial view to be able to login with Facebook.


Add these views to the solution.

Account/Login.cshtml
Extend login with partial view to login with facebook and other identity providers.


@using System.Web.Optimization
@model TestSite.Models.Account.LoginViewModel
 
@{
    ViewBag.Title = "Log in";
    Layout = null;
}
 
<meta http-equiv="X-UA-Compatible" content="IE=EmulateIE7" />
<link type="text/css" rel="stylesheet" href="/util/styles/login.css" />
<meta name="robots" content="noindex,nofollow" />
 
<link href="../App_Themes/Default/Styles/system.css" type="text/css" rel="stylesheet" />
<link href="../App_Themes/Default/Styles/ToolButton.css" type="text/css" rel="stylesheet" />
 
 
<body class="epi-loginBody">
 
    <div class="epi-loginContainer">
        <div id="FullRegion_LoginControl">
 
            <div class="epi-loginTop">
            </div>
            <div class="epi-loginMiddle">
                <div class="epi-loginContent">
                    <div class="epi-loginLogo">@ViewBag.Title.</div>
                    <div class="epi-loginForm">
                        <h1><span style="color: Red;"></span></h1>
 
                        <div id="FullRegion_LoginControl_ValidationSummary1" style="display: none;">
 
                        </div>
                        <div class="epi-credentialsContainer">
 
 
                            @using (Html.BeginForm("Login", "Account", new { ReturnUrl = ViewBag.ReturnUrl }, FormMethod.Post, new { @class = "form-horizontal", role = "form" }))
                            {
                                @Html.AntiForgeryToken()
 
                                @Html.ValidationSummary(true)
                                <div class="epi-float-left">
                                    @Html.LabelFor(m => m.UserName, new { @class = "episize80" })
                                    <br />
                                    <div class="">
                                        @Html.TextBoxFor(m => m.UserName, new { @class = "epi-inputText" })
                                        @Html.ValidationMessageFor(m => m.UserName)
                                    </div>
                                    <span id="FullRegion_LoginControl_RequiredFieldValidator1" style="display: none;">­</span>
                                </div>
 
                                <div class="epi-float-left">
                                    @Html.LabelFor(m => m.Password, new { @class = "episize80" })
                                    <br />
                                    <div class="">
                                        @Html.PasswordFor(m => m.Password, new { @class = "epi-inputText" })
                                        @Html.ValidationMessageFor(m => m.Password)
                                    </div>
                                    <span id="FullRegion_LoginControl_RequiredFieldValidator2" style="display: none;">­</span>
                                </div>
 
                                <div class="epi-button-container epi-float-left">
                                    <span class="epi-button">
                                        <span class="epi-button-child">
                                            <input type="submit" value="Log in" class="epi-button-child-item" />
                                        </span>
                                    </span>
                                </div>
                                <div class="epi-checkbox-container">
                                    <span class="epi-checkbox">
                                        @Html.CheckBoxFor(m => m.RememberMe)
                                        @Html.LabelFor(m => m.RememberMe)
                                    </span>
                                </div>
                            }
 
                        </div>
                    </div>
                </div>
                <div class="epi-loginBottom">
                </div>
            </div>
            <div class="epi-credentialsContainer" style="margin-left: 30px; margin-bottom: 10px;">
                @Html.Partial("_ExternalLoginsListPartial", new TestSite.Models.Account.ExternalLoginViewModel() { Action = "ExternalLogin", ReturnUrl = ViewBag.ReturnUrl })
            </div>
        </div>
 
    </div>
</body>
@section Scripts {
    @Scripts.Render("~/bundles/jqueryval")
}

Account/_ExternalLoginsListPartial.cshtml
List out the identity providers that has been configured.


@using Microsoft.Owin.Security
@model TestSite.Models.Account.ExternalLoginViewModel
 
<b>Log on using these Providers.</b><br />
 
@{
    var loginProviders = Context.GetOwinContext().Authentication.GetExternalAuthenticationTypes();
    if (loginProviders.Count() == 0)
    {
 
<p>There are no external authentication services configured. </p>
 
    }
    else
    {
        string action = Model.Action;
        string returnUrl = Model.ReturnUrl;
        using (Html.BeginForm(action, "Account", new { ReturnUrl = returnUrl }))
        {
            @Html.AntiForgeryToken()
            <div id="socialLoginList">
                <p>
                    @foreach (AuthenticationDescription p in loginProviders)
                    {
                    <button type="submit" class="btn btn-default" id="@p.AuthenticationType" name="provider" value="@p.AuthenticationType" title="Log in using your @p.Caption account">@p.AuthenticationType</button>
                    }
                </p>
            </div>
        }
    }
}

Account/ExternalLoginConfirmation.cshtml
Confirmation view after the user have logged in to facebook or other identity providers.


@using System.Web.Optimization
@model TestSite.Models.Account.ExternalLoginConfirmationViewModel
@{
    ViewBag.Title = "Register";
    Layout = null;
}
 
<meta http-equiv="X-UA-Compatible" content="IE=EmulateIE7" />
<link type="text/css" rel="stylesheet" href="/util/styles/login.css" />
<meta name="robots" content="noindex,nofollow" />
 
<link href="../App_Themes/Default/Styles/system.css" type="text/css" rel="stylesheet" />
<link href="../App_Themes/Default/Styles/ToolButton.css" type="text/css" rel="stylesheet" />
 
 
<body class="epi-loginBody">
 
    <div class="epi-loginContainer">
        <div id="FullRegion_LoginControl">
 
            <div class="epi-loginTop">
            </div>
            <div class="epi-loginMiddle">
                <div class="epi-loginContent">
                    <div class="epi-loginLogo">@ViewBag.Title.</div>
                    <h3>Associate your @ViewBag.LoginProvider account.</h3>
                    <div class="epi-loginForm">
                        <h1><span style="color: Red;"></span></h1>
 
                        <div id="FullRegion_LoginControl_ValidationSummary1" style="display: none;">
 
                        </div>
                        <div class="epi-credentialsContainer">
 
                            @using (Html.BeginForm("ExternalLoginConfirmation", "Account", new { ReturnUrl = ViewBag.ReturnUrl }, FormMethod.Post, new { @class = "form-horizontal", role = "form" }))
                            {
                                @Html.AntiForgeryToken()
 
                                <h4>Association Form</h4>
                                <hr />
                                @Html.ValidationSummary(true)
                                <p class="text-info">
                                    You've successfully authenticated with <strong>@ViewBag.LoginProvider</strong>.
                                    Please enter a user name for this site below and click the Register button to finish
                                    logging in.
                                </p>
                                <br />
                                <div class="form-group">
                                    @Html.LabelFor(m => m.UserName, new { @class = "col-md-2 control-label" })
                                    <div class="col-md-10">
                                        @Html.TextBoxFor(m => m.UserName, new { @class = "form-control" })
                                        @Html.ValidationMessageFor(m => m.UserName)
                                    </div>
                                </div>
                                <div class="form-group">
                                    <div class="col-md-offset-2 col-md-10">
                                        <input type="submit" class="btn btn-default" value="Register" />
                                    </div>
                                </div>
                            }
 
 
                        </div>
                    </div>
                </div>
                <div class="epi-loginBottom">
                </div>
            </div>
        </div>
 
    </div>
    @section Scripts {
        @Scripts.Render("~/bundles/jqueryval")
    }

Account/ExternalLoginFailure.cshtml
This view can be extended more with layout.
@{
    ViewBag.Title = "Login Failure";
    Layout = null;
}
 
<h2>@ViewBag.Title.</h2>
<h3 class="text-error">Unsuccessful login with service.</h3>

Add this line in the Header.cshtml
Add this code snippet into the header view to render out picture and name of user.

      @{Html.RenderAction("_UserPartial", "Account");}

Account/_UserPartial.cshtml
Display the user picture from facebook and name.

<div>
    @if (!string.IsNullOrEmpty(ViewBag.ProviderKey))
    {
        <img src=@Url.Content("https://graph.facebook.com/" + ViewBag.ProviderKey + "/picture?type=small") alt="@ViewBag.UserName" />
    }
</div>
<div>
    <h3>@ViewBag.UserName</h3>
</div>

Add these code lines in the Models/Account/AccountViewModels.cs
    public class ExternalLoginViewModel
    {
        public string Action { get; set; }
        public string ReturnUrl { get; set; }
    }

Add these code lines in the Controllers/AccountController.cs
You don't need to add the StoreFacebookAuthToken if you aren't going to use facebook data in your solution. It also contain code that would add the facebook user to a Episerver role.
       //
        // POST: /Account/ExternalLogin
        [HttpPost]
        [AllowAnonymous]
        [ValidateAntiForgeryToken]
        public ActionResult ExternalLogin(string provider, string returnUrl)
        {
            // Request a redirect to the external login provider
            return new ChallengeResult(provider,
                Url.Action("ExternalLoginCallback", "Account", new { ReturnUrl = returnUrl }));
        }
 
        //
        // GET: /Account/ExternalLoginCallback
        [AllowAnonymous]
        public async Task<ActionResult> ExternalLoginCallback(string returnUrl)
        {
            var loginInfo = await AuthenticationManager.GetExternalLoginInfoAsync();
            if (loginInfo == null)
            {
                return RedirectToAction("Login");
            }
 
            // Sign in the user with this external login provider if the user already has a login
            var user = await UserManager.FindAsync(loginInfo.Login);
            if (user != null)
            {
                //Save the FacebookToken in the database if not already there
                await StoreFacebookAuthToken(user);
                await SignInAsync(user, false);
                return RedirectToLocal(returnUrl);
            }
            // If the user does not have an account, then prompt the user to create an account
            ViewBag.ReturnUrl = returnUrl;
            ViewBag.LoginProvider = loginInfo.Login.LoginProvider;
            return View("ExternalLoginConfirmation",
                new ExternalLoginConfirmationViewModel { UserName = loginInfo.DefaultUserName });
        }
 
        private async Task StoreFacebookAuthToken(ApplicationUser user)
        {
            var claimsIdentity = await AuthenticationManager.GetExternalIdentityAsync(DefaultAuthenticationTypes.ExternalCookie);
            if (claimsIdentity != null)
            {
                // Retrieve the existing claims for the user and add the FacebookAccessTokenClaim
                var currentClaims = await UserManager.GetClaimsAsync(user.Id);
                var facebookAccessToken = claimsIdentity.FindAll("FacebookAccessToken").First();
                if (!currentClaims.Any())
                {
                    await UserManager.AddClaimAsync(user.Id, facebookAccessToken);
                }
                //NB! These lines will add the user to the facebookgroup (role)
                var assingedRoles = await UserManager.GetRolesAsync(user.Id);
                if (!assingedRoles.Contains("WebAdmins") || !assingedRoles.Contains("WebEditors") || !assingedRoles.Contains("FacebookGroup"))
                {
                    await UserManager.AddToRoleAsync(user.Id, "FacebookGroup");
                }
            }
        }
 
        //
        // POST: /Account/ExternalLoginConfirmation
        [HttpPost]
        [AllowAnonymous]
        [ValidateAntiForgeryToken]
        public async Task<ActionResult> ExternalLoginConfirmation(ExternalLoginConfirmationViewModel model,
            string returnUrl)
        {
            if (User.Identity.IsAuthenticated)
            {
                return View(model); //ERROR?
            }
 
            if (ModelState.IsValid)
            {
                // Get the information about the user from the external login provider
                var info = await AuthenticationManager.GetExternalLoginInfoAsync();
                if (info == null)
                {
                    return View("ExternalLoginFailure");
                }
                var user = new ApplicationUser { UserName = model.UserName };
                var result = await UserManager.CreateAsync(user);
                if (result.Succeeded)
                {
                    result = await UserManager.AddLoginAsync(user.Id, info.Login);
                    if (result.Succeeded)
                    {
                        await StoreFacebookAuthToken(user);
                        await SignInAsync(user, false);
                        return RedirectToLocal(returnUrl);
                    }
                }
                AddErrors(result);
            }
 
            ViewBag.ReturnUrl = returnUrl;
            return View(model);
        }
 
        [AllowAnonymous]
        public ActionResult _UserPartial()
        {
            var userId = User.Identity.GetUserId();
            if (!string.IsNullOrEmpty(userId))
            {
                var claimsforUser = UserManager.GetClaims(userId);
                Claim firstOrDefault = claimsforUser.FirstOrDefault(x => x.Type == "FacebookAccessToken");
                if (firstOrDefault != null)
                {
                    var accessToken = firstOrDefault.Value;
                    var fb = new FacebookClient(accessToken);
                    dynamic myInfo = fb.Get("me?fields=first_name,last_name,id");
                    ViewBag.ProviderKey = myInfo.id;
                    ViewBag.UserName = myInfo.first_name + " " + myInfo.last_name;
                }
                else
                {
                    var user = await UserManager.FindByIdAsync(userId);
                    ViewBag.UserName = user.UserName;
                }
            }
            return PartialView();
        }

       // Used for XSRF protection when adding external logins
        private const string XsrfKey = "XsrfId";
 
        private class ChallengeResult : HttpUnauthorizedResult
        {
            public ChallengeResult(string provider, string redirectUri) : this(provider, redirectUri, null)
            {
            }
 
            public ChallengeResult(string provider, string redirectUri, string userId)
            {
                LoginProvider = provider;
                RedirectUri = redirectUri;
                UserId = userId;
            }
 
            public string LoginProvider { get; set; }
            public string RedirectUri { get; set; }
            public string UserId { get; set; }
 
            public override void ExecuteResult(ControllerContext context)
            {
                var properties = new AuthenticationProperties { RedirectUri = RedirectUri };
                if (UserId != null)
                {
                    properties.Dictionary[XsrfKey] = UserId;
                }
                context.HttpContext.GetOwinContext().Authentication.Challenge(properties, LoginProvider);
            }
        }

        private void AddErrors(IdentityResult result)
        {
            foreach (var error in result.Errors)
            {
                ModelState.AddModelError("", error);
            }
        }

Testing the solution
So after all is implemented and compiled you will come to a facebook login screen after you hit the "facebook" button on the episerver login screen.


After you have logged in you get a form where you can register the user in the local storage, but then without the password.


After hitting the registration button you will return to the start screen where the facebook picture and name is displayed.

Database
If you look in the Identity database after you have register, you will notice the password is set to null on the facebook user.


Okey. That's it. Happy coding!


References

Thursday, November 5, 2015

How to fix the roles in EPiServer when using ASP.NET Identity


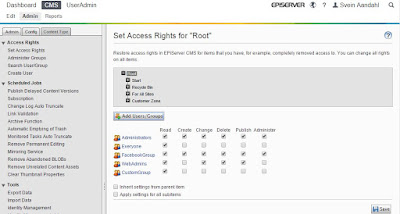
If you go into admin in EPiServer and then "Set Access Rights for", you will fail to choose your Identity 2.0 roles. Reason for this is that the Access Rights GUI in EPiServer are closely connected to the old membership provider, which you disable when you implement the ASP.NET Identity.

After a short brainstorm with my colleague Roger Nesheim, it became quite clear that the quickest way to fix this legacy problem was to use Dependency Injection and Inversion of Control. StructureMap is a DI/IOC tool exclusively for .NET programming, which we will use in this EPiServer projects. It helps in achieving looser coupling among classes and their dependencies.

Edit:
As Per suggested in the comment field, it's also possible to to implement this using built in provider instead of using StructureMap. So by add the following code in web.config and add the IdentitySecurityEntityProvider.cs to the project it will also work. Thanks :-)


  <episerver.framework>
    <securityEntity>
      <providers>
        <add name="IdentityProvider" type="TestSite.Business.AccessRights.IdentitySecurityEntityProvider, TestSite" />
      </providers>
    </securityEntity>
    <appData basePath="App_Data" />
    <scanAssembly forceBinFolderScan="true" />
    <virtualRoles addClaims="true">
      <providers>

Solution

First you need to setup the DI/IOC to override the “SecurityEntityProvider” and replace it with “IdentitySecurityEntityProvider” class. The setup below show how to do that.

ServiceLocationConfiguration.cs


using System;
using EPiServer.Security;
using StructureMap;
using TestSite.Business.AccessRights;
 
namespace TestSite.Business.ServiceLocation
{
    public static class ServiceLocationConfiguration
    {
        public static Action<ConfigurationExpression> Current
        {
            get
            {
                return configuration =>
                {
                    configuration.For<SecurityEntityProvider>().Use(() => new IdentitySecurityEntityProvider());
                };
            }
        }
    }
}

DependenciesInitializationModule.cs


using EPiServer.Framework;
using EPiServer.Framework.Initialization;
using EPiServer.ServiceLocation;
 
namespace TestSite.Business.ServiceLocation
{
    [InitializableModule]
    [ModuleDependency(typeof(ServiceContainerInitialization))]
    public class DependenciesInitializationModule : IConfigurableModule
    {
        public void Initialize(InitializationEngine context)
        {
        }
        public void Preload(string[] parameters) { }
        public void Uninitialize(InitializationEngine context)
        {
            //Add uninitialization logic
        }
        public void ConfigureContainer(ServiceConfigurationContext context)
        {
            context.Container.Configure(ServiceLocationConfiguration.Current);
        }
    }
}

Then you will need to override the different Search functions with new code to handle the communication with the ASP.NET Identity database. When this is in place the access rights with users and group will work as it used to.
Disclaimer: The code isn't tested on large database with a lot of users and groups.

IdentitySecurityEntityProvider.cs


using System;
using System.Collections.Generic;
using System.Linq;
using EPiServer.Security;
using TestSite.Models.Account;
 
namespace TestSite.Business.AccessRights
{
  public class IdentitySecurityEntityProvider : PagingSupportingSecurityEntityProvider
  {
    private readonly ApplicationDbContext _db = new ApplicationDbContext();
 
    public override IEnumerable<string> GetRolesForUser(string userName)
    {
        var theUser = _db.Users.FirstOrDefault(u => u.UserName.Equals(userName, StringComparison.CurrentCultureIgnoreCase));
        return theUser == null ? Enumerable.Empty<string>() : theUser.Roles.Select(role => _db.Roles.Find(role.RoleId).Name.ToString()).AsEnumerable();
    }
 
    public override IEnumerable<SecurityEntity> Search(string partOfValue, string claimType)
    {
      int totalCount;
      return this.Search(partOfValue, claimType, 0, int.MaxValue, out totalCount);
    }
 
    public override IEnumerable<SecurityEntity> Search(string partOfValue, string claimType, int startIndex, int maxRows, out int totalCount)
    {
      totalCount = 0;
      switch (claimType)
      {
        case "http://schemas.microsoft.com/ws/2008/06/identity/claims/role":
          return this.SearchRoles(partOfValue, startIndex, maxRows, out totalCount);
        case "http://schemas.xmlsoap.org/ws/2005/05/identity/claims/name":
        case "http://schemas.xmlsoap.org/ws/2005/05/identity/claims/nameidentifier":
          return this.SearchUsers(partOfValue, startIndex, maxRows, out totalCount);
        case "http://schemas.xmlsoap.org/ws/2005/05/identity/claims/emailaddress":
          if (!string.IsNullOrEmpty(partOfValue))
              return this.SearchEmails(partOfValue, startIndex, maxRows, out totalCount);
          else
              return Enumerable.Empty<SecurityEntity>();
        default:
          return Enumerable.Empty<SecurityEntity>();
      }
    }
 
    private IEnumerable<SecurityEntity> SearchEmails(string partOfName, int startIndex, int maxRows, out int totalCount)
    {
        var usersList = _db.Users.ToList();
        var users = usersList.Where(a => a.Email != null && a.Email.ToLower().Contains(partOfName.ToLower())).ToList();
        var entityList = users.Select(user => new SecurityEntity(user.Email)).ToList();
        totalCount = entityList.Count;
        return entityList;
    }
 
    private IEnumerable<SecurityEntity> SearchUsers(string partOfName, int startIndex, int maxRows, out int totalCount)
    {
        totalCount = 0;
        if (_db.Users == null) return Enumerable.Empty<SecurityEntity>();
        var usersList = _db.Users.ToList();
        var entityList = !string.IsNullOrEmpty(partOfName) ? usersList.Where(a => a.UserName.ToLower().Contains(partOfName.ToLower())).ToList().Select(user => new SecurityEntity(user.UserName)).ToList() : usersList.Select(user => new SecurityEntity(user.UserName)).ToList();
        totalCount = entityList.Count;
        return entityList;
    }
 
    private IEnumerable<SecurityEntity> SearchRoles(string partOfName, int startIndex, int maxRows, out int totalCount)
    {
        totalCount = 0;
        if (_db.Roles == null) return Enumerable.Empty<SecurityEntity>();
        var rolesList = _db.Roles.ToList();
        var roles = rolesList.Where(a => a.Name.ToLower().Contains(partOfName.ToLower())).ToList();
        var entityList = roles.Select(role => new SecurityEntity(role.Name)).ToList();
        totalCount = entityList.Count;
        return entityList;
    }
  }
}

TIPS! Do not forget to add your “CustomGroups” to the correct location paths in Web.Config, e.g. the admin part. Or else the users in this group will not be able to access the edit and admin in EPiServer.


  <location path="EPiServer/CMS/admin">
    <system.web>
      <authorization>
        <allow roles="WebAdmins, Administrators, CustomGroup" />
        <deny users="*" />
      </authorization>
    </system.web>
  </location>

After you are finished with compiling, you should be able to create new custom roles in the Admin tool solution I have created earlier.


Then you can click add “Users/ group button” in the “Set Access rights” module. Choose users or group and then add it with the green arrows and click OK.


Then it will appear in the list below. Problem solved!


Happy coding!