First of all, you should get the solution up and running without SSL. You will find a guide how to do that from this blog:
There are a two elements you will need to add to the web.config, when you want to add ssl support to your solution. Changes are marked with yellow background.
Web.config
Web.config
<system.serviceModel>
<serviceHostingEnvironment multipleSiteBindingsEnabled="true" />
<bindings>
<webHttpBinding>
<binding name="IndexingServiceCustomBinding" maxBufferPoolSize="1073741824" maxReceivedMessageSize="2147483647" maxBufferSize="2147483647">
<security mode="Transport">
<transport clientCredentialType="None"></transport>
</security>
<readerQuotas maxStringContentLength="10000000" />
</binding>
</webHttpBinding>
</bindings>
</system.serviceModel>
<episerver.search active="true">
<namedIndexingServices defaultService="serviceName">
<services>
<add name="serviceName" baseUri="https://DNS-name/IndexingService/IndexingService.svc" accessKey="local" />
</services>
</namedIndexingServices>
<searchResultFilter defaultInclude="true">
<providers />
</searchResultFilter>
</episerver.search>
IIS
In IIS you will need to add a https binding and perhaps remove the http. :-)
If not, you should read on. :-)
TIPS! «HTTP Activation» is a feature that is often forgot. So it's always smart to check if that's activated for the asp.net version you use in the project.
My experience is that it’s usually two things with the setup that’s not correct, when using SSL together with standard search. One is the lack of knowledge about certificates and how to install them, and second is how to setup the IIS correct.
Different certificates
The most used certificate types are «Domain validated certificates» and «Extended validation certificates». The use of EV certificate can be easily spotted by that the url field in the browser get an «green bar» in the beginning. More and more sites has started to use these EV certificates.They usually cost little more and takes longer to order because of the validation process.
Extended Validation Certificate
EV certificates use the same encryption as domain validated certificates: The increase in security is due to the identity validation process, which is indicated inside the certificated by the policy identifier.
Before IIS8, there was an problem to have more than one certificate per server, since most server have only one IP address. Often this could be solve by using a SAN certificate that contain several domains.
With Windows 2012 (IIS8) came a new feature called Server Name Identification (SNI), which made it possible to use several certificate on same IP.
You can find more information on how to install this things here:
Single Certificate and Multiple Certificates Using SNI (IIS8)
https://www.digicert.com/ssl-certificate-installation-microsoft-iis-8.htm
SAN Ceritifcate ( Multi-Domain )
Development environment
In development we usually just create a self-signed certificate. When you create this in IIS they are usually «Issued To» your computer name. What you write in as Friendly name doesn’t really mater.
So, if you want to avoid to getting a certificate error when you run your site in the browser you should use your machine name as localhost name.
TIPS! If you only are using one certificate you put the certificate into «Personal». If you are going to use SNI, you must add it to «Web Hosting».
How to access the certificate
If you get access denied in the log file, here is a way to fix that. After you have create the certificate to the Personal folder, then type "MMC" in Windows search and open it up.(got an icon of a red tool box)
Then goto FILE -> Add/Remove Snap-in. -> Select Certificates -> click Add-> Select Computer account -> Local Computer -> Finished -> Ok.
Then open up Certificates -> Personal. Here you will find the certificate you have created or installed earlier.
Right click on the certificate(marked blue on picture above) -> All tasks -> Manage Private Keys -> Add "Network Service" user -> Remove «Full control» (only read is necessary) -> OK
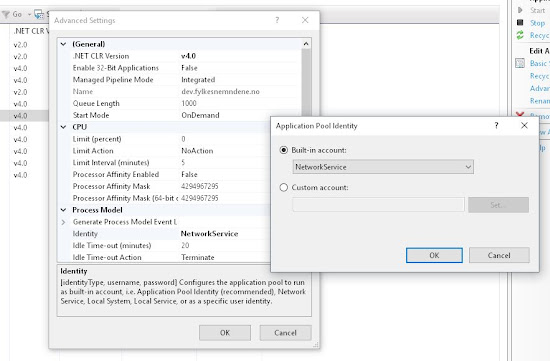
Now add «Network Service» to the Application Pool to the site you use in IIS for the site with SSL. This will give the App pool identity access to both certificate and the site.
Happy configuring! :-)


No comments:
Post a Comment
Note: Only a member of this blog may post a comment.